This document will provide you with a comprehensive understanding of how to leverage Move2Kube to migrate your applications to Kubernetes. We will also cover step-by-step procedures to use the tool, potential problems that may be encountered, and suggestions for improvements.
Table of Contents
1. Overview
Move2Kube is an innovative tool designed to simplify and accelerate the process of migrating applications to Kubernetes. It assists users in creating Kubernetes artifacts from existing applications, thereby facilitating the swift and efficient transition of applications to a Kubernetes environment. Move2Kube is a part of the Konveyor community, an open-source project that provides tools and guidance to help companies modernize and migrate their applications.
2. Prerequisites and procedures
Before you get started, ensure you have the following tools installed:
- Docker
- Kubernetes (or a Kubernetes cluster you have access to)
- Access to the source code of the applications you want to move
CLI Tool
1. Install the Move2Kube CLI tool: The first step is to install the CLI tool on your system.
Unsetbash <(curl https://raw.githubusercontent.com/konveyor/move2kube/main/scripts/install.sh)
2. Download the language platforms sample: Use the provided script to download a set of sample applications in different languages that need to be containerized and deployed to Kubernetes. The language-platforms directory will have applications in Java, Go, Python, Ruby, etc.
Unsetcurl https://move2kube.konveyor.io/scripts/download.sh | bash -s -- -d samples/language-platforms -r move2kube-demos
3. Generate a plan file: Run the command move2kube plan -s language-platforms to generate a plan file. The -s flag is used to specify a source directory. In this case, the language-platforms directory is given because we want Move2Kube to analyze the source code inside the language-platforms directory and come up with a plan for transforming them to Kubernetes YAMLs.
Unsetmove2kube plan -s language-platforms
move2kube transform in the src directory. This will do the transformation according to the plan generated. You can also provide a custom plan by using the `-p` flag. During the transformation Move2Kube asks several questions to help guide the process, most questions can be answered using default options. Important questions that you may want to change are:- The container registry and namespace that you want to use. A container registry is where all the images are stored (Example: Quay, Docker Hub, etc.)
- The ingress hostname and ingress TLS secret. If you are deploying to MiniKube then give localhost as the ingress host and leave the TLS secret blank.
5. Transformation results: After all questions are answered. When it's done, it will generate a directory called `myproject`. The name of the output directory can be changed by changing the project name using the `-n` flag.
Unset$ ls language-platforms language-platforms.zip m2k.plan m2kconfig.yaml m2kqacache.yaml myproject------------------------------------------------------------------------ $ ls myproject/ Readme.md deploy scripts source
Now the application can be deployed to Kubernetes using the generated artifacts.
Web Interface
1. Run the Docker command: You can use Docker to access the Move2Kube Web interface.
Unsetdocker run --rm -it -p 8080:8080 quay.io/konveyor/move2kube-ui:v0.3.0
2. Access the UI in `http://localhost:8080`.
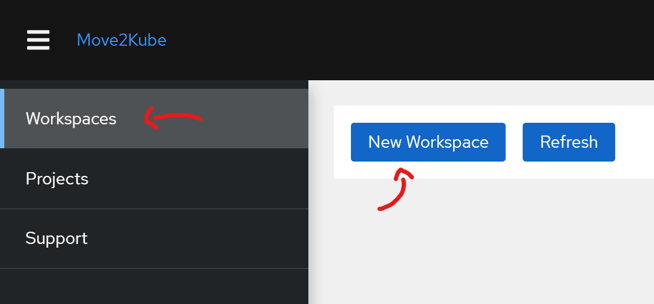
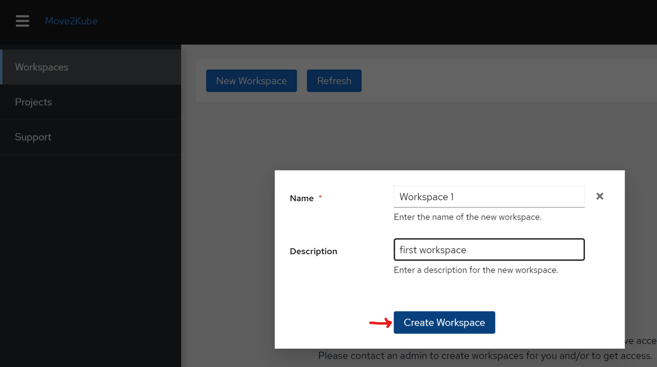
3. Create a Workspace: Click on the Workspaces section in the sidebar menu and then `New Workspace` button.

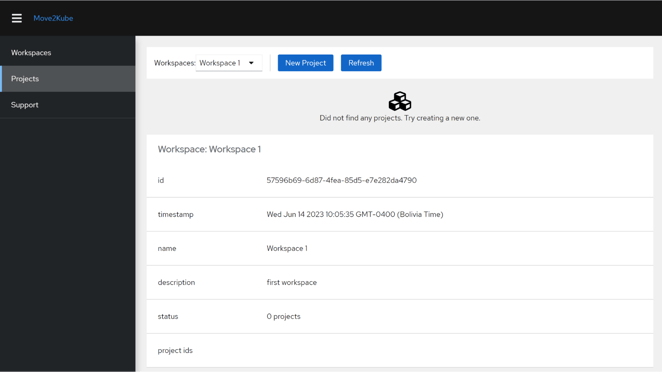
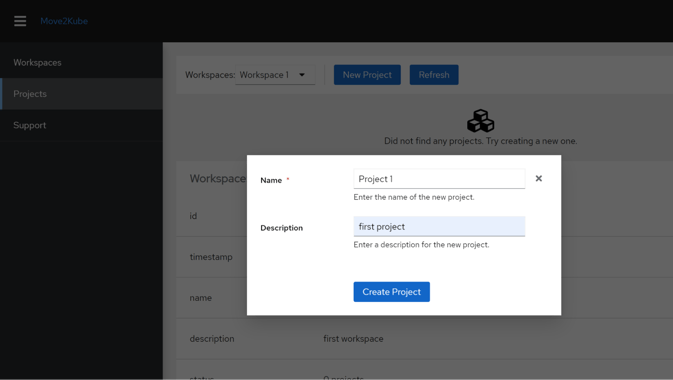
4. Create a new project: Click on the create a `New Project` button in the upper side of the page and then `Create Project`
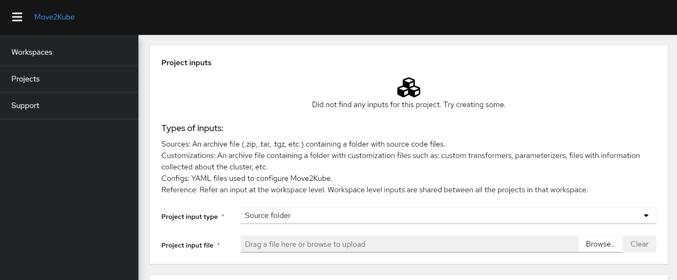
5. Upload your input: Scroll down until the `Project Inputs` section, select the project input type, and then drag/browse your zip file.
6. Start Planning: In the section below there is the `Plan` section with a now available button to start verifying the available services in your input.
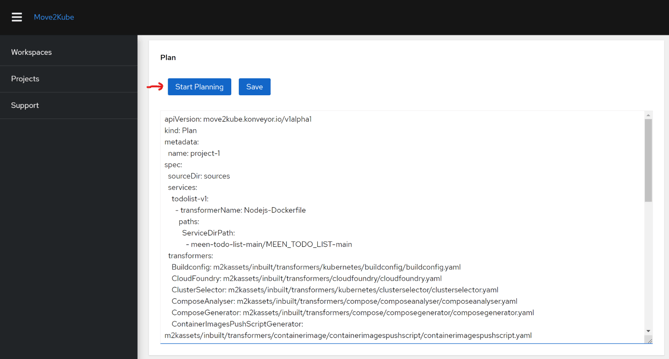
Note: Important questions may not be skipped, such as the type of cluster to deploy, Service type, Service port, Image runtime, and Image registry.
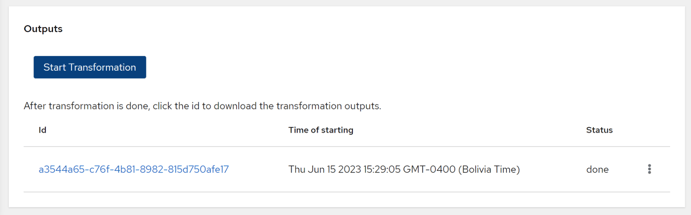
7. Begin transformation process: Now in the `Outputs` section click on the button `Start Transformation` where you will be asked the necessary information to better adjust the output. Choose the options that best fits your needs (most of the prompts may be default) and click the `Next` and the transformation will begin. Finally a new row with an ID will appear, click on it and your output will be downloaded to your machine.
8. Transformation Results: After you unzip your output file, there will be a new directory with the name of your project (`project-1` in this case). This folder contains all the scripts, docker files and Kubernetes artifacts needed to apply your app into a Kubernetes infrastructure.
The knowledge base required: While Move2Kube aids in the migration process, it is essential to have a basic understanding of Kubernetes and containerization. If you are not familiar with these concepts, please consider investing time in learning them before proceeding with the migration.
Building and Deploying
After getting the output file you can follow the following steps to get your application up and running in your cluster.
- Build the Docker Image: Navigate to the scripts directory and execute the
`buildimages.sh`(or buildimages.bat for Windows users) script to construct the Docker image. - Push the Docker Image: Upon successful construction of the Docker image, users can run the
`pushimages.sh`script (or`buildandpushimages_multiarch.sh`for multi-architecture images) to push the image to their Docker registry. - Deploying the Application: Then go to the
`deploy`directory, which offers a variety of deployment options. These include:- cicd: Contains templates for setting up a continuous integration and deployment pipeline.
- compose: Contains Docker Compose files if you prefer deploying using Docker.
- knative: Contains Knative service manifests for serverless deployments.
- knative-parameterized: Contains parameterized Knative service manifests.
- yamls: Contains standard Kubernetes manifests. Use kubectl apply -f yamls/ to deploy to your cluster.
- yamls-parameterized: Contains parameterized Kubernetes manifests.
Choose the appropriate directory and apply the manifests to your cluster.
3. Examples
Programming Language app
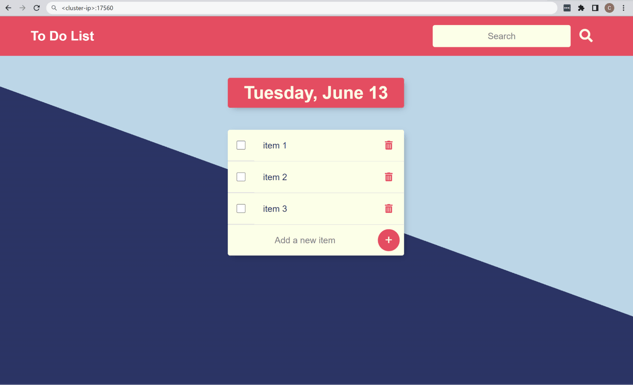
In this example, we have a Node.js application, and we would like to move it to a Kubernetes cluster. We'll use a simple ToDo list application for this demonstration.
Once the transformation process is completed and the output file has been created, you can follow the steps below to move your application to Kubernetes.
At the end of the process, you should have a directory structure that looks like this:
nodejs/├── MEEN_TODO_LIST│ ├── README.md│ ├── app.js│ ├── date.js│ ├── package-lock.json│ ├── package.json│ ├── public│ └── views├── m2k-graph.json├── m2k.plan├── m2kconfig.yaml├── m2kqacache.yaml└── myproject ├── Readme.md ├── deploy ├── scripts └── source
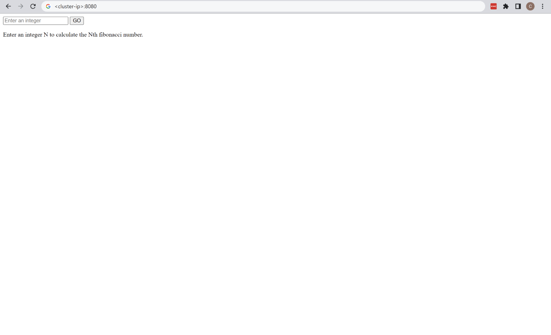
After following the building and deploying steps, you should be able to access the application at:
http://<your-cluster-ip> or \<cluster-ingress-domain>:<port>/.

Cloud Foundry app
In this example, we have a Cloud Foundry application, and we would like to move it to a Kubernetes cluster. We'll use a simple express application for this demonstration.
Prerequisites
- Cloud Foundry CLI
- Access to a Cloud Foundry environment
In this case, the 3 step process of move2kube is needed to deploy the application.
- Collect: Run the
`move2kube collect -a cf`command to collect the application from Cloud Foundry. This command will ask you for the Cloud Foundry API endpoint, username, and password. It will then collect the application from Cloud Foundry. The data will be stored in a new directory called`/m2k_collect`.This folder contains the yaml file which has the runtime information of the particular application that you are trying to transform. There is information about the buildpacks that are supported, the memory, the number of instances and the ports that are supported. If there are environment variables, it collects that information too. - Plan: Run the
`move2kube plan -s <cloud-foundry src>`command to generate a plan for your project, analyzing its dependencies and providing recommendations for the transformation. This command will generate a plan for your project. The plan will be stored in a file called`m2k.plan`. This file contains the information about the services that are present in the application, the ports that are exposed by the application and the environment variables that are present in the application. - Transform: Run the
`move2kube transform -s <cloud-foundry src> -t <target directory>`command to transform your application to the target directory. This command will transform the application to the target directory. The target directory will contain the transformed artifacts and scripts to build and deploy your application.
The structure of the directory after the transformation will be as follows:
cloud-foundry/
├── cfnodejsapp
│   ├── main.js
│   ├── manifest.yml
│   ├── package-lock.json
│   └── package.json
├── m2k-graph.json
├── m2k.plan
├── m2k_collect
│   └── cf
├── m2kconfig.yaml
├── m2kqacache.yaml
└── myproject
    ├── Readme.md
    ├── deploy
    ├── scripts
    └── source
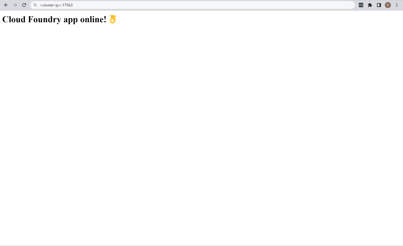
After following the building and deploying steps, you should be able to access the application at
http://<your-cluster-ip> or <cluster-ingress-domain>:<port>/.
Docker Compose app
In this example, we have Docker-Compose. It's also a web app but it has 3 services. A frontend written in PHP for Apache, an API backend written for NodeJS and a service for caching the calculations performed by the backend. For the cache service we use a prebuilt Redis image.
Once the transformation process is completed and the output file has been created, you can follow the steps below to move your application to Kubernetes.
At the end of the process, you should have a directory structure that looks like this:
docker-compose/├── m2k-graph.json├── m2k.plan├── m2kconfig.yaml├── m2kqacache.yaml├── multiple-services│ ├── api│ ├── docker-compose.yaml│ ├── web│ └── zuul└── myproject ├── Readme.md ├── deploy ├── scripts └── source
After following the building and deploying steps, you should be able to access the application at:
http://<your-cluster-ip> or <cluster-ingress-domain>:<port>/.
Kubernetes to Kubernetes (Helm Chart - Kustomize - OpenShift Templates)
In this example, we're dealing with an application already running on Kubernetes. We have Kubernetes manifests, and we want to transform them into different formats: Helm Chart, Kustomize, and Openshift Templates.
To transform Kubernetes manifests to Helm, Kustomize or Openshift Templates, you can follow these steps:
- Plan: Run the
`move2kube plan -s <kubernetes-manifests-src> command`to generate a plan for your project. The source directory should contain your Kubernetes manifests. This command will analyze the manifests and generate a plan for the transformation. - Transform: Run the
`move2kube transform -s <kubernetes-manifests-src> -t <target directory>`command to transform your Kubernetes manifests to the target directory. This command will transform the Kubernetes manifests into Helm Chart, Kustomize, and Openshift Templates based on the generated plan.
At the end of the process, your directory structure will look like this:
kubernetes-to-kubernetes/├── api-deployment.yaml├── api-service.yaml├── redis-deployment.yaml├── redis-service.yaml├── web-deployment.yaml├── web-ingress.yaml├── web-service.yaml├── m2k-graph.json├── m2k.plan├── m2kconfig.yaml├── m2kqacache.yaml└── myproject └── source ├── kubernetes-to-kubernetes-versionchanged │ ├── api-deployment.yaml │ ├── api-service.yaml │ ├── redis-deployment.yaml │ ├── redis-service.yaml │ ├── web-deployment.yaml │ ├── web-ingress.yaml │ └── web-service.yaml └── kubernetes-to-kubernetes-versionchanged-parameterized ├── helm-chart ├── kustomize └── openshift-template
In the `kubernetes-to-kubernetes-versionchanged-parameterized` folder, you can find the transformed formats:
- The
`helm-chart`directory contains the Helm Chart for your application. - The
`kustomize`directory contains the Kustomize format of your application. - The
`openshift-template`directory contains the Openshift Template for your application.
The deployment procedure for these formats differs:
- Helm: After installing Helm to your cluster, run
`helm install <release-name> ./helm-chart`to deploy your application. - Kustomize: Run
`kubectl apply -k ./kustomize`to deploy your application. - Openshift: After logging into your Openshift cluster, run
`oc new-app -f ./openshift-template`to deploy your application.
After following the deployment steps, you should be able to access the application at
http://<your-cluster-ip> or <cluster-ingress-domain>:<port>/.
(Did not include a screenshot for this example because the application is the same as the Docker Compose example)
4. Problems encountered
1. On Node.js applications the `transform` command assumes that the application contains a `start` script in the package.json file of your source folder. Hence, if you do not have one the final product of your application will not run.
2. On .Net Core applications, if you change the default port when prompted. It will not modify the docker file, meaning that port will be the default one (80). Need to make sure to add the following command to the docker file:
`ENV ASPNETCORE_URLS=http://+:<port>`.
Improvements
1. They could add a feature so that a terraform artifact can be generated from helm and kubernetes yaml files.
2. Add the feature to convert a Helm Chart to docker compose.
3. Update the capabilities for the programming language transformer so it can update the ports on .Net Core apps and if the user does not have a “start” script in the Node.js app it will execute using the binary.
Capability Gaps
Move2Kube is a tool built to ease the migration of applications to Kubernetes. Despite its robust functionality, there are some areas where it may fall short.
For complex applications with intricate dependencies, Move2Kube might struggle to fully automate the process. Some manual intervention could be necessary to ensure smooth migration.
Although it supports many popular languages and frameworks, it might not encompass all technology stacks, especially less common or newer ones. Users working with such technologies might need to prepare for potential challenges.
While capable of generating basic Kubernetes configurations, Move2Kube might not adequately cater to more advanced or specific use cases. Users may need to manually tweak the configurations for such scenarios.
Its capacity to accurately identify and manage all dependencies, particularly when they are dynamic or complex, may be limited. This could require additional attention during the migration process.
Container optimization might not always be achieved with Move2Kube. Manual adjustments could be necessary to ensure optimal container performance, size, and security.
Lastly, keeping up with rapid advancements in the cloud-native ecosystem is vital for maintaining Move2Kube effectiveness. Regular updates and maintenance are required to ensure it stays relevant and efficient. Which, based on data, they are in fact doing!
Appendix
- Move2Kube Documentation - https://konveyor.github.io/move2kube/
- Move2Kube Github Demos - https://github.com/konveyor/move2kube-demos/tree/main
- Gitlab repository of this project - https://gitlab.com/shadow-soft/practice-areas/kubernetes-examples/kubernetes-project-testing/konveyor