Longhorn is an open-source distributed block storage system designed to provide persistent storage for containerized environments, particularly Kubernetes clusters.
Table of Contents
| 1. Procedure on how to deploy |
| 2. Problem encountered |
Overview
Longhorn is an open-source distributed block storage system designed to provide persistent storage for containerized environments, particularly Kubernetes clusters. Meaning Longhorn distributes and replicates data across multiple disks and nodes inside a cluster, ensuring high availability and data resilience. Another key functionality of Longhorn is snapshots and backups, allowing to capture data at a certain point in time. It offers an alternative to other storage solutions like Kubernetes' built-in Persistent Volumes (PVs) and external storage systems like NFS or S3.
1. Procedure on how to deploy
Choosing a Kubernetes cluster
For this deployment there are several options that could be used, e.g (AKS, RKE, K3S). The best option to choose would be one that is cheap and reliable. After completing the process I would recommend RKE given the ease of use for deploying applications in their appmarket. This documentation will be going through the process of installation based on an AKS cluster.
Creating an AKS cluster:
- Sign in to the Azure portal.
- On the Azure portal menu or from the Home page, select Create a resource.
- In the Categories section, select Containers > Azure Kubernetes Service (AKS).
- On the Basics page, configure as needed the options like Cluster name, Region, AZs.
- Turn AKS pricing tier to Free tier (If testing, if production keep it in standard)
- NOTE:
- Minimum requirements recommendations: -- Rancher Labs suggests allocating at least 4 vCPUs per Longhorn manager instance. For the Longhorn manager, it is recommended to allocate at least 4 GB of RAM.
- Node recommendations: -- To ensure optimal functionality Longhorn needs a minimum 3 nodes
- NOTE:
- On the primary node pool configure Node size to the desired sizing.
- On node count range, adjust the minimum to 3.
- Click Review + Create
For replication purposes create at least two AKS clusters. So if needed repeat the steps for creating an AKS cluster.
After both clusters are created, access them individually to install Longhorn on each cluster.
Installing Longhorn
1. Access the cluster by using Azure cloud shell
Unsetaz aks get-credentials --resource-group <MyResourceGroup> --name <NameOfCluster>
2. Install Longhorn instance
Unsetkubectl apply -f https://raw.githubusercontent.com/longhorn/longhorn/v1.4.2/deploy/longhorn.yaml
You can monitor the installation by using the following command
Unsetkubectl get pods \--namespace longhorn-system \--watch
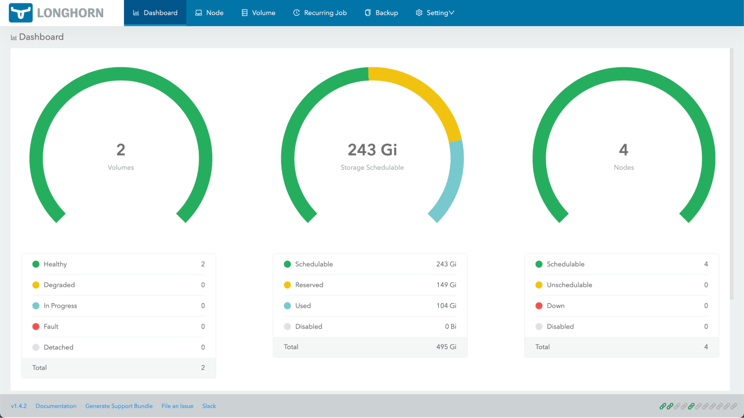
3. Check that the deployment was successful
Unsetkubectl -n longhorn-system get pod
Longhorn UI is not readily accessible, to access it do this few adjustments to get to the UI.
4. Run the following command to see all the services running in the longhorn system namespace
Unsetkubectl -n longhorn-system get svc
Take a look at the longhorn frontend to check if it is exposed at the moment. If not, it will look like this:
UnsetNAME TYPE CLUSTER-IP EXTERNAL-IP longhorn-frontend ClusterIP 10.0.196.128 <none>
5. Select the longhorn-frontend and edit the information for cluster IP to LoadBalancer type
Unsetkubectl -n longhorn-system edit svc longhorn-frontend
When done correctly, Longhorn frontend should look like this:
UnsetNAME TYPE CLUSTER-IP EXTERNAL-IP longhorn-frontend LoadBalancer 10.0.73.56 4.236.209.49
6. Copy the external IP, create a new tab and paste it.
It should be like that, but empty.
You would repeat this process with the other cluster you want to replicate.
After both clusters have instances of longhorn set up, create MinIO backup stores. MinIO is an object storage solution that provides an Amazon Web Services S3-compatible API and supports all core S3 features. MinIO is built to deploy anywhere, public or private cloud, bare metal infrastructure, orchestrated environments, and edge infrastructure.
Installing MinIO
There are 2 approaches to install MinIO, first one is to deploy pods inside the kubernetes cluster, second approach would be creating a virtual machine apart from the clusters where MinIO will live on its own.
WARNING: Pods use an empty directory trick, which serves as a temporary storage that would be compromised in case of a restart.
This documentation will deploy MinIO in a virtual machine:
- Enter virtual machines in the search.
- Under Services, select Virtual Machines.
- In the Virtual Machines page, select Create and then Virtual Machine. The Create a Virtual Machine page opens.
- On the Basics page, configure as needed the options like VM name, Region, AZs etc.
- On the image section select Ubuntu
- Minimum requirements recommendations: -- MinIO suggests allocating at least 4 vCPUs per MinIO server instance. For the Longhorn manager, it is recommended to allocate at least 16 GB of RAM.
- You can get away with less depending on the sizing of your applications but for production that is the recommended minimum.
- Select your VM sizing.
- Click Review + Create.
When the machine is up, go to connect and SSH into the machine using the password you just created with the VM.
Install MinIO with the following command:
Unsetwget https://dl.min.io/server/minio/release/linux-amd64/archive/minio_20230602231726.0.0_amd64.deb -O minio.debsudo dpkg -i minio.deb
Then, create a directory for MinIO
Unsetmkdir ~/minio
Finally, we launch the server for MinIO with the following command
Unsetminio server ~/minio --address :9000 --console-address :9090
Output should be like this:
UnsetAPI: http://192.0.2.10:9000 http://127.0.0.1:9000RootUser: minioadminRootPass: minioadminConsole: http://192.0.2.10:9090 http://127.0.0.1:9090RootUser: minioadminRootPass: minioadmin
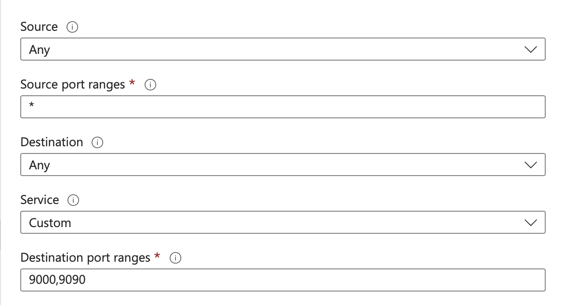
Our MinIO instance should be up and running. To be able access the UI create an ingress rule. Go back to the Azure portal and inside our MinIO virtual machine under networking create an inbound port rule called MinIO access opening the firewall to port 9000 and 9090. It should look like this:
Take the public IP and using the port 9090 to access the MinIO User interface.
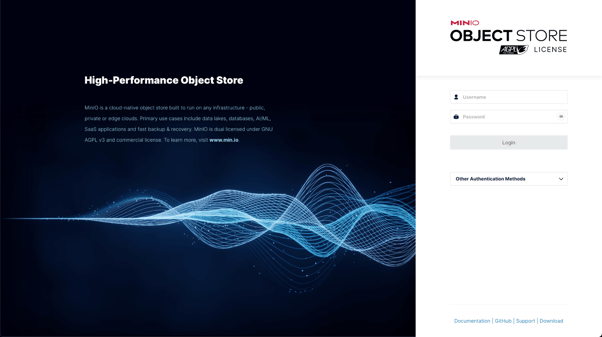
Log in to the Console with the RootUser and RootPass user credentials displayed in the output. These default to minioadmin | minioadmin.
When inside the object browser, create a bucket named Longhorn, then under access keys, create an access key and copy the displayed information as it won't be accessible after. You will need this to create a secret that will be used by Longhorn.
Creating a MinIO secret
Use the following template to create a YAML secret with your information.
apiVersion: v1kind: Secretmetadata: name: minio-secret namespace: longhorn-systemtype: Opaquedata: AWS_ACCESS_KEY_ID: <INPUT_BASE_64> # YOUR_ACCESS_KEY AWS_SECRET_ACCESS_KEY: <INPUT_BASE_64> # YOUR_SECRET_KEY AWS_ENDPOINTS: <INPUT_BASE_64> # http://<YOUR_IP>:9000/
Use the following pipe command to convert your keys to base64 to fill in the template.
Unsetecho -n <INFO> | base64
Then you will apply it in both clusters.
Unsetkubectl apply -f minio-secret.yml
Configuring backup target
Access both Longhorn instances and go to settings; under the backup section, you will find Backup target and Backup target Credential Secret.
Warning:
-
- Backup target expects an S3 path formatted like:
s3://<ip>@<region>/<name-of-bucket>/
But it doesn't really work well. - If you don’t put the / at the end, backup section might crash
- Backup target expects an S3 path formatted like:
In the backup target you are going to put s3://longhorn@local/longhorn/ and in the backup target credential secret, you are going to fill it with the name of your secret. If you followed the template this should be minio-secret.
Deploying pods that use PVC
WARNING: -- If you try to deploy any application that uses an app, you most likely will encounter a problem as Longhorn has become the default storage class, but Kubernetes has its own default storage class.
1. Check if you have more than one default storage class with the following command
Unsetkubectl get storageclasses.storage.k8s.io
2. If that's the case, then patch all the storage classes until Longhorn is the only default one.
Unsetkubectl patch storageclass <storageclass-name> -p '{"metadata": {"annotations":{"storageclass.kubernetes.io/is-default-class":"false"}}}'
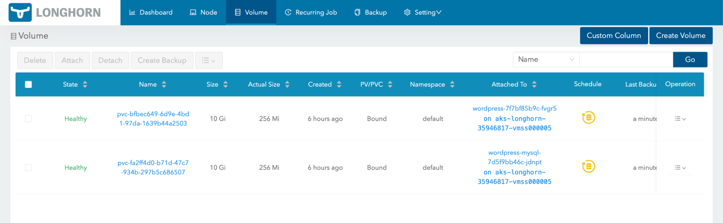
Now you can deploy any application to test Longhorn. After it is deployed, go to volumes and you should see the persistent volume claims there.
2. Problems encountered
Longhorn documentation is pretty confusing, and most of the information is hidden under bold links instead of sections in the index.
The use of S3 protocol in the backup target nullified the use for blob storage in Azure, as it really wasn't S3 compatible, ending in the implementation of MinIO object storage. The backup target section is the most complicated part as in the documentation, it is listed that it has to follow a certain structure, even though the structure is not really functional, causing crashes when following the correct structure. To solve it, users must use s3://longhorn@local/longhorn/ as stated above in the configuring backup target section.
Even when configured correctly if you access the backup section of the menu you might still get a pop-up saying error.
Cronjobs for replication of backups might take longer than expected, depending on the region the Longhorn instances are located.
In some cases backups may get in a faulted state, to fix it you will need to delete all volumes and recreate the backups again.
Improvements
- Performance and scalability: Longhorn was taking some time to back up a WordPress instance that had really no information on it.
- Integration inconsistencies: Some backups would cause a faulted state on instances because the information inside would change or disappear.
- Better documentation: Documentation was confusing and could lead to tunnel vision as some important information is hidden in links inside texts rather than as their own topic in the index.
- More community engagement: Few tutorials or troubleshooting forums lead to higher time spent debugging and blocked
Capability Gaps
Snapshots and backups can't be installed in hot, meaning that you will need to detach, stop, and redeploy the pod for the backed-up data to be transferred. Users will have to create maintenance windows or have downtime for their applications.
Incomplete support for new storage technologies like NVME or Storage Class Memory (SCM).
Appendix
This section will serve to organize important links and diagrams referenced throughout this document.
- Quickstart to deploy an AKS cluster in Azure Portal - https://learn.microsoft.com/en-us/azure/aks/learn/quick-kubernetes-deploy-portal?tabs=azure-cli
- Installing Longhorn - https://longhorn.io/docs/1.4.2/deploy/install/install-with-kubectl/#installing-longhorn
- Creating a Linux VM in Azure Portal - https://learn.microsoft.com/en-us/azure/virtual-machines/linux/quick-create-portal?tabs=ubuntu
Contact us to learn how we might be able to help.