This project dives deep into the technical exploration of monitoring a cloud infrastructure that hinges upon the technology of Skupper, integrated with the power of Neuvector – a platform backed by SUSE.
Table of Contents
| 1. Skupper |
| 2. Neuvector |
| 3. Infrastructure requirements for Skupper and Neuvector |
| 4. Project Description |
| 5. Setting up the project |
Overview
This project dives deep into the technical exploration of monitoring a cloud infrastructure that hinges upon the technology of Skupper, integrated with the power of Neuvector – a platform backed by SUSE. The dynamic duo of Skupper and Neuvector combines forces to create a network architecture that's not only interconnected but inherently secure. The crux of this project lies in the seamless synergy between Skupper and Neuvector. This isn't just about establishing connections; it's about creating a dynamically monitored ecosystem. Neuvector's unwavering vigilance continuously scans traffic flowing through interconnected clusters, capturing insights that fuel informed decisions and proactive strategies.
1. Skupper
Skupper is an open-source tool for creating VANs in Kubernetes. By using Skupper, you can create a distributed application consisting of microservices running in different Kubernetes clusters.
This diagram illustrates a Skupper network that connects three services running in three different Kubernetes clusters:

In a Skupper network, each namespace contains a Skupper instance. When these Skupper instances connect, they continually share information about the services that each instance exposes. This means that each Skupper instance is always aware of every service that has been exposed to the Skupper network, regardless of the namespace in which each service resides.
Once a Skupper network is formed across Kubernetes namespaces, any of the services in those namespaces can be exposed (through annotation) to the Skupper network. When a service is exposed, Skupper creates proxy endpoints to make that service available on each namespace in the Skupper network.
2. Neuvector
NeuVector is a comprehensive container security platform designed to protect the network aspects of your cloud-native applications and microservices running in Kubernetes and other container orchestration environments. It focuses on safeguarding the runtime environment and network communications of containerized applications.
At its core, NeuVector provides advanced network visibility and security capabilities for containers. It helps organizations ensure the security and compliance of their containerized workloads by offering features such as:
- Network Security: NeuVector monitors network traffic between containers and enforces security policies to detect and prevent unauthorized communications. It helps mitigate risks associated with lateral movement and potential breaches within the container environment.
- Runtime Security: The platform employs behavioral learning and anomaly detection techniques to identify and prevent suspicious activities or runtime threats within containers. This proactive approach helps safeguard containers from potential zero-day vulnerabilities.
- Vulnerability Management: NeuVector scans container images for known vulnerabilities before deployment and during runtime, allowing organizations to address security issues before they become exploitable threats.
- Compliance Assurance: By defining security policies based on industry standards and best practices, NeuVector helps organizations adhere to compliance requirements and prevent security misconfiguration.
- Visibility and Monitoring: The platform provides real-time visibility into container network traffic, allowing security teams to monitor interactions and detect any unauthorized or suspicious activities.
- Incident Response: In the event of a security incident or violation, NeuVector offers insights and tools for incident investigation, enabling organizations to respond effectively and prevent similar incidents in the future.
NeuVector's integration with Kubernetes and other container orchestration tools makes it particularly well-suited for securing dynamic and complex containerized environments. Its ability to adapt to the dynamic nature of container deployments and protect against various network-based threats makes it a valuable component in ensuring the security of cloud-native applications.
3. Infrastructure Requirements for Skupper and Neuvector
- For this implementation, the AKS clusters needed to have (each):
- 8gb of memory
- 4 CPUs
- Also needed:
- Skupper CLI.
- Deployment of the Bookinfo application.
- Neuvector deployed on both clusters.
4. Project Description
For this project, a test app named Bookinfo was deployed, which displays information about books. The infrastructure proposed for this project is two AKS clusters to deploy the numerous services of the application between them. In order for the application to work with its services split into the two clusters, Skupper was implemented, making a Virtual Application Network between them, and then deploying Neuvector on both clusters.
After the deployment of Neuvector, there are a couple of configurations to be made:
- Configuring the multi-cluster management: Enterprise Multi-Cluster Management | NeuVector Docs.
- Enable the Network Security Policy Mode (On Protect Mode)

When all the configurations are ready, then it's good to proceed with the creation of the federation policies and groups.
For more information about this topic, please refer to the official Neuvector documentation: NeuVector Docs.
5. Setting Up the Project
5.1 Skupper Booking App installation
- Initialize Skupper:
- In your first cluster (let's call it '
west'):$ kubectl config use-context westskupper init - In your second cluster (let's call it '
east'):$ kubectl config use-context eastskupper init
- In your first cluster (let's call it '
- Link Clusters:
- In the '
west' cluster, create a connection-token:$ skupper token create -f /tmp/skupper/west.token - In the '
east' cluster, use the token to create a link:$ skupper link create /tmp/skupper/west.token
- In the '
- Deploy the Bookinfo App:
- Deploy the app components in the '
west' cluster:$ kubectl apply -f https://raw.githubusercontent.com/skupperproject/skupper-example-bookinfo/main/bookinfo.yaml - Expose the details of service with Skupper:
$ skupper expose deployment details --port 9080
- Deploy the app components in the '
- Verify Connectivity:
- Check that services are exposed and connected across clusters:
$ skupper status
- Check that services are exposed and connected across clusters:
5.2 NeuVector Deployment on Kubernetes
- Namespace and Service Accounts:
$ kubectl create namespace neuvector$ kubectl create sa controller -n neuvector$ kubectl create sa enforcer -n neuvector$ kubectl create sa basic -n neuvector$ kubectl create sa updater -n neuvector
- NeuVector Images:
- Ensure you use the appropriate version tags for NeuVector components and update the image references in the deployment YAML files.
- Pod Security:
- If you've enabled PSA in Kubernetes 1.25+ or Pod Security Policies, configure them for NeuVector.
$ kubectl label namespace neuvector "pod-security.kubernetes.io/enforce=privileged"
- If you've enabled PSA in Kubernetes 1.25+ or Pod Security Policies, configure them for NeuVector.
- Custom Resources (CRD):
- Deploy CRDs for NeuVector security rules for Kubernetes 1.19+.
$ kubectl apply -f https://raw.githubusercontent.com/neuvector/manifests/main/kubernetes/5.2.0/crd-k8s-1.19.yamlkubectl apply -f https://raw.githubusercontent.com/neuvector/manifests/main/kubernetes/5.2.0/waf-crd-k8s-1.19.yamlkubectl apply -f https://raw.githubusercontent.com/neuvector/manifests/main/kubernetes/5.2.0/dlp-crd-k8s-1.19.yamlkubectl apply -f https://raw.githubusercontent.com/neuvector/manifests/main/kubernetes/5.2.0/admission-crd-k8s-1.19.yaml
- Deploy CRDs for NeuVector security rules for Kubernetes 1.19+.
- Deploy Components:
- Deploy the NeuVector components using the provided YAML files.
$ kubectl create clusterrole neuvector-binding-app --verb=get,list,watch,update --resource=nodes,pods,services,namespaces$ kubectl create clusterrole neuvector-binding-rbac --verb=get,list,watch --resource=rolebindings.rbac.authorization.k8s.io,roles.rbac.authorization.k8s.io,clusterrolebindings.rbac.authorization.k8s.io,clusterroles.rbac.authorization.k8s.io$ kubectl create clusterrolebinding neuvector-binding-app --clusterrole=neuvector-binding-app --serviceaccount=neuvector:controller$ kubectl create clusterrolebinding neuvector-binding-rbac --clusterrole=neuvector-binding-rbac --serviceaccount=neuvector:controller$ kubectl create clusterrole neuvector-binding-admission --verb=get,list,watch,create,update,delete --resource=validatingwebhookconfigurations,mutatingwebhookconfigurations$ kubectl create clusterrolebinding neuvector-binding-admission --clusterrole=neuvector-binding-admission --serviceaccount=neuvector:controller$ kubectl create clusterrole neuvector-binding-customresourcedefinition --verb=watch,create,get,update --resource=customresourcedefinitions$ kubectl create clusterrolebinding neuvector-binding-customresourcedefinition --clusterrole=neuvector-binding-customresourcedefinition--serviceaccount=neuvector:controller$ kubectl create clusterrole neuvector-binding-nvsecurityrules --verb=list,delete --resource=nvsecurityrules,nvclustersecurityrules$ kubectl create clusterrolebinding neuvector-binding-nvsecurityrules --clusterrole=neuvector-binding-nvsecurityrules --serviceaccount=neuvector:controller$ kubectl create clusterrolebinding neuvector-binding-view --clusterrole=view --serviceaccount=neuvector:controller$ kubectl create clusterrole neuvector-binding-nvwafsecurityrules --verb=list,delete --resource=nvwafsecurityrules$ kubectl create clusterrolebinding neuvector-binding-nvwafsecurityrules --clusterrole=neuvector-binding-nvwafsecurityrules --serviceaccount=neuvector:controller$ kubectl create clusterrole neuvector-binding-nvadmissioncontrolsecurityrules --verb=list,delete --resource=nvadmissioncontrolsecurityrules$ kubectl create clusterrolebinding neuvector-binding-nvadmissioncontrolsecurityrules --clusterrole=neuvector-binding-nvadmissioncontrolsecurityrules --serviceaccount=neuvector:controller$ kubectl create clusterrole neuvector-binding-nvdlpsecurityrules --verb=list,delete --resource=nvdlpsecurityrules$ kubectl create clusterrolebinding neuvector-binding-nvdlpsecurityrules --clusterrole=neuvector-binding-nvdlpsecurityrules --serviceaccount=neuvector:controller$ kubectl create role neuvector-binding-scanner --verb=get,patch,update,watch --resource=deployments -n neuvector$ kubectl create rolebinding neuvector-binding-scanner --role=neuvector-binding-scanner --serviceaccount=neuvector:updater --serviceaccount=neuvector:controller -n neuvector$ kubectl create clusterrole neuvector-binding-csp-usages --verb=get,create,update,delete --resource=cspadapterusagerecords$ kubectl create clusterrolebinding neuvector-binding-csp-usages --clusterrole=neuvector-binding-csp-usages --serviceaccount=neuvector:controller```
- Deploy the NeuVector components using the provided YAML files.
- Verify Deployment:
- Check the status using:
$ kubectl get pods -n neuvector$ kubectl get svc -n neuvector
- Check the status using:
5.3 NeuVector Multi-Cluster Monitoring
- Primary Cluster Setup:
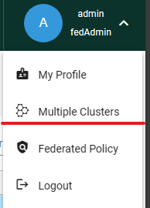
- Log into the console for the cluster which will be the Primary cluster. In the upper right drop-down menu, select Multiple Clusters and then Promote to configure the Primary.
- Enter the public IP and port of the fed-master service. You can find this by running.
kubectl get svc -n neuvector - The output will look something like this:
NAME TYPE CLUSTER-IP EXTERNAL-IP PORT(S) AGE
fed-master LoadBalancer 10.27.249.147 35.238.131.23 11443:31878/TCP 17d
fed-worker LoadBalancer 10.27.251.1 35.226.199.111 10443:32736/TCP 17d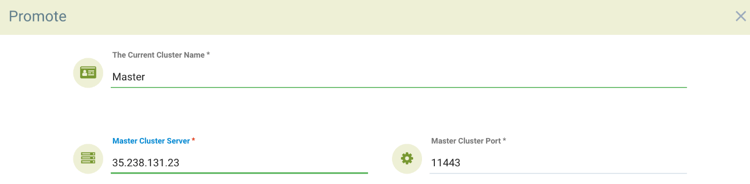
- Log into the console for the cluster which will be the Primary cluster. In the upper right drop-down menu, select Multiple Clusters and then Promote to configure the Primary.
- Remote Cluster Setup:
- After logging back into the console, select Multiple Clusters again from the upper right menu and click on the icon to generate a token needed to connect the remote clusters. Copy the token for use in the next step. The token is valid for about 1 hour, and if it expires, it must be generated again to connect future remote clusters.

- To join a remote cluster to the primary, login to the remote cluster console as an admin. Select Multiple Clusters from the upper right drop-down, and click on Join. Enter the controller IP or hostname for the remote cluster as well as the port.
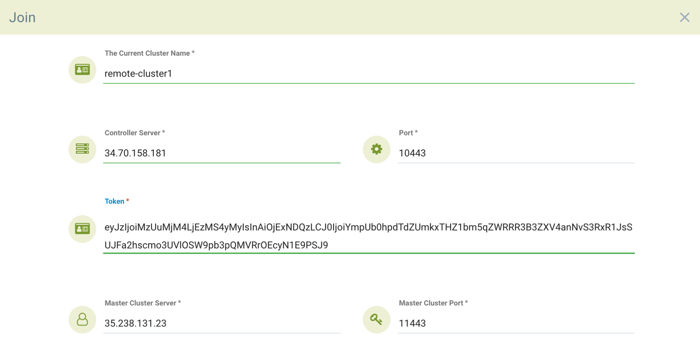
- Use the output for the fed-worker of the remote cluster to configure the IP address and port. Then, enter the token copied from the primary. Note that after entering the token, the IP address and port for the primary will be automatically filled in, but this can be edited or manually entered.
- After logging back into the console, select Multiple Clusters again from the upper right menu and click on the icon to generate a token needed to connect the remote clusters. Copy the token for use in the next step. The token is valid for about 1 hour, and if it expires, it must be generated again to connect future remote clusters.
- Federated Policy:
- After all is set and done, you’ll need to go to the sidebar and search the Policy -> Groups section. There, you will see all the groups discovered by Neuvector:
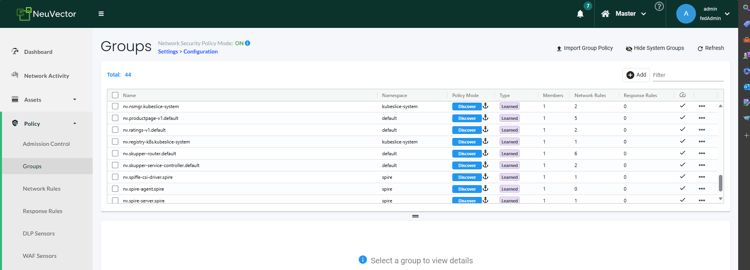
-
- After noting what groups you are interested in, you’ll need to go to the drop-down menu in the upper right and select the Federated Policy -> Groups section to create the federated groups.

- After you created all the corresponding federated groups of all the services you want to apply network rules to, go to the Federated Policy -> Network Rules section then create the rule to deny the traffic between the services that you want.
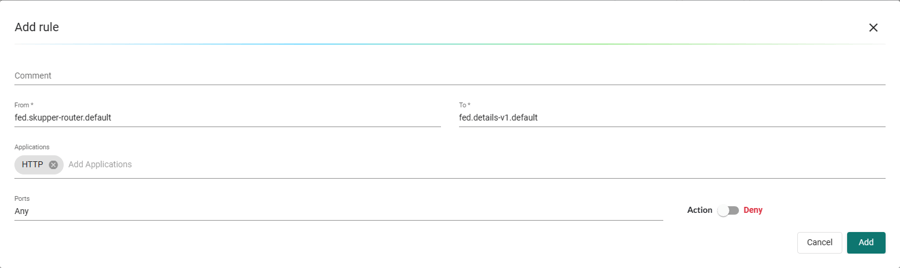
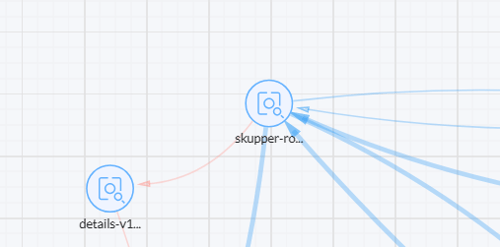
- After you add and save the rule you should go to the sidebar and to Network Activity, you should see the line between the two services that you deny the traffic red.
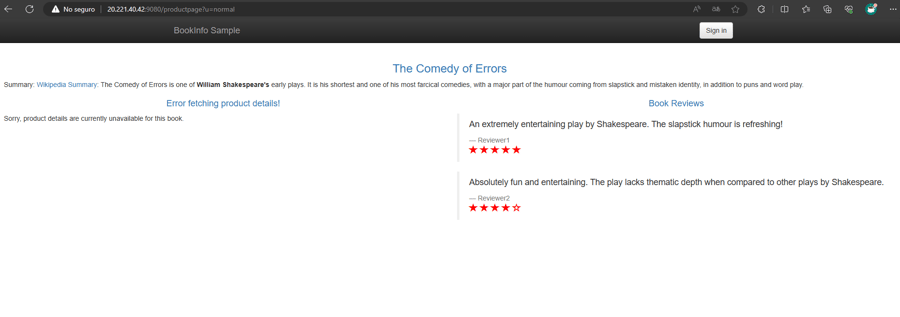
- And the service won't be able to get the data that it was receiving before:
- After noting what groups you are interested in, you’ll need to go to the drop-down menu in the upper right and select the Federated Policy -> Groups section to create the federated groups.
Links
- Neuvector Documentation - NeuVector Docs
- Skupper Documentation - Skupper overview
For other inquiries or support, please feel free to contact us here! We can help you think through your specific issues and use cases.